Archive for the ‘Tapestry Crochet Tutorial’ Category

Bead Felted

Saturday, February 22nd, 2014

Have you seen Michele Maks’ wonderful new crochet pattern subscription site, Mainly Crochet? For more about this innovative business venture, take a look at Michele’s blog and Mainly Crochet’s Facebook page.

Mainly Crochet Tapestry Set

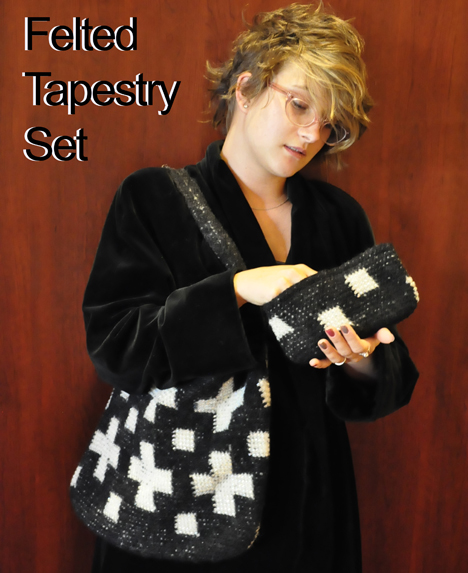
MainlyCrochet.com’s Felted Tapestry Set (photo by Don Patty).

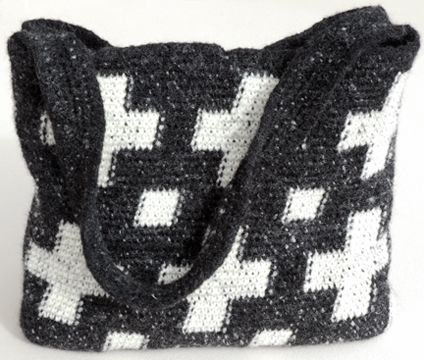
I’m thrilled that my bead felted tote and matching cosmetic bag are now included in Mainly Crochet’s pattern inventory. The tote is fully reversible because of the seamless one piece construction and the fact that the motif is integrated into the fabric as it is tapestry crocheted. One side has beads and the other is plain, so it’s two totes in one!

Felted Tapestry Crochet Bag before

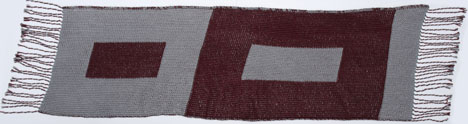
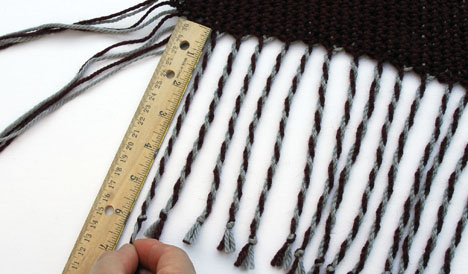
Tapestry crochet tote before felting, 13″ high by 18″ wide, worsted wool.

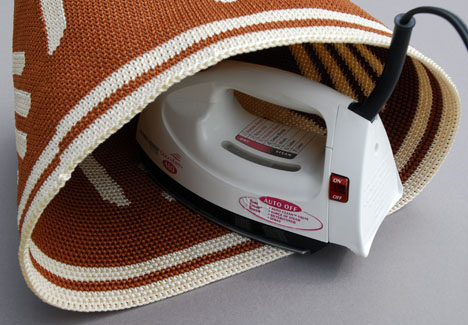
Large, loose stitches felt wonderfully in a washing machine. The carried yarn makes the fabric durable, so no lining is necessary.

Bead Felted Tapestry Crochet Bag

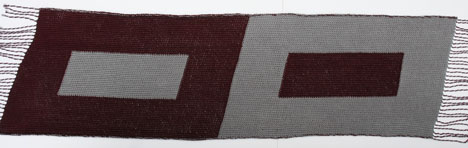
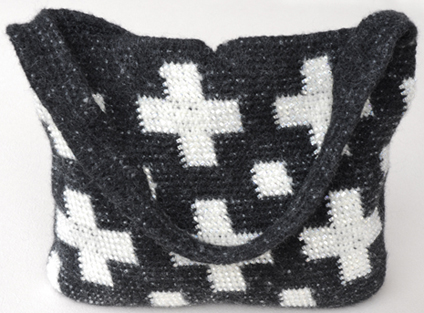
Bead side of the tapestry crochet tote before felting, 13″ high by 18″ high, worsted wool and size 5 triangular glass beads from Fire Mountain Gems.

Glass beads are heavy, so I only put them as accents in the squares and on the arms of the crosses, for a subtle sparkle.

Felted Tapestry Crochet Bag detail

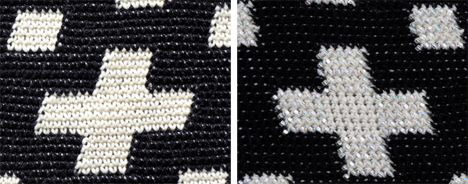
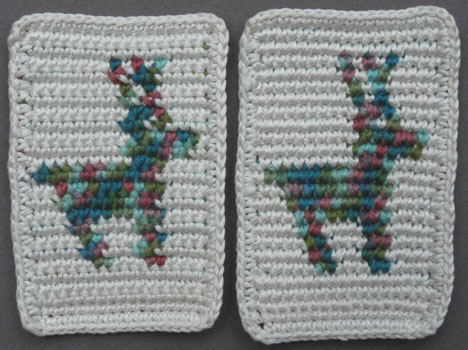
Detail of the plain (on the left) and beaded sides of the tapestry crochet fabric before felting.

Felted Tapestry Crochet Bag

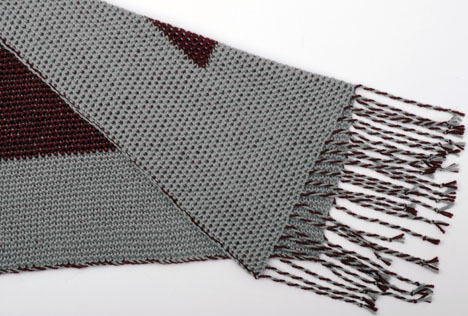
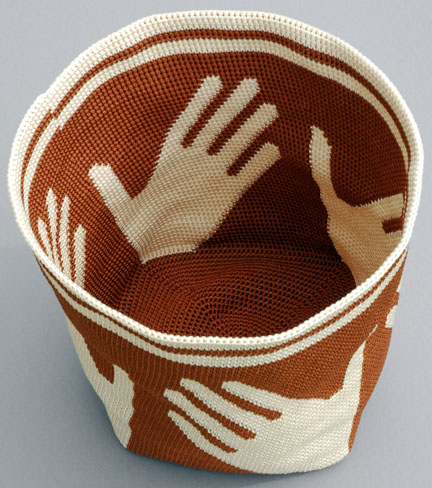
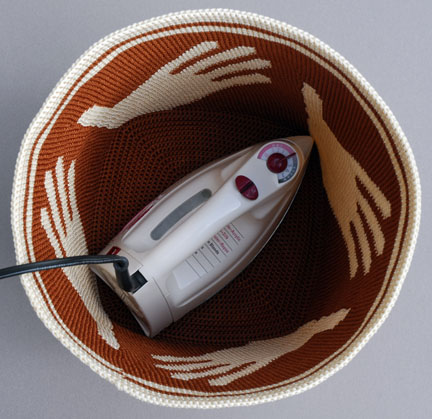
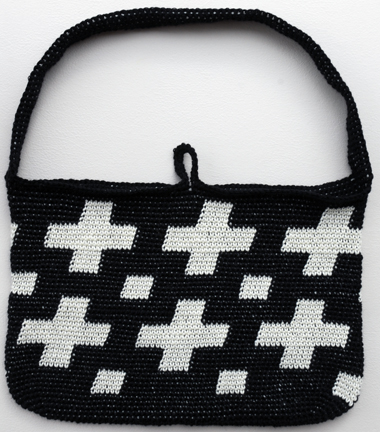
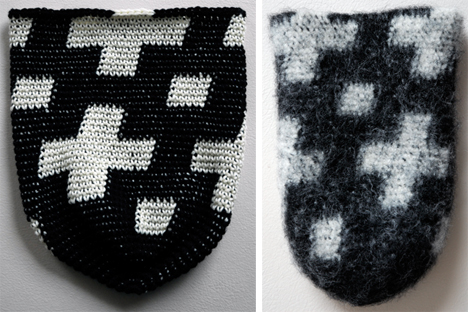
Finished felted tapestry crochet tote, 12 1/2″ high by 14 1/2″ wide, worsted wool.

Bead Felted Bag

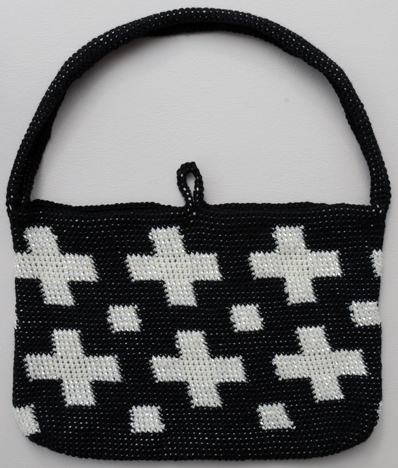
Finished beaded felted tapestry crochet tote, 12 1/2″ high by 14 1/2″ high, worsted wool and glass beads.

As usual, I experimented and made a large swatch (below) before crocheting the above bag. As you can see in the before and after pictures, the tapestry crocheted fabric shrinks more horizontally than it does vertically. The loose stitches allow specks of black to show in the white and white dots the black – but large stitches are necessary for successful felting. No problem for me because I actually like the “tweedy” look.

Tapestry Crochet Swatch

Tapestry crochet swatch – before and after felting.

I had to experiment with the cosmetic bag, too. Each of the finished bags (below on the right) have a zipper closure.

Before After Tapestry Crochet Bags

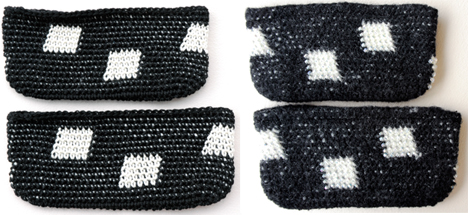
Tapestry crochet cosmetic bags before and after felting. My first attempt is on top.

I hope you’ll give this Felted Tapestry Set a try. If you have never done felted tapestry crochet, you might consider making a Felted Amulet Bag, the free introductory felting project linked to my web page that includes online instructions and a video tutorial. Please also take a look at my Bead & Felted Tapestry Crochet book and web page for more inspiration.

Switching Colors

Saturday, September 15th, 2012

Do your yarns twist around each other when you tapestry crochet? Well, there’s a simple solution to avoid this problem. Just place one color on your right and the other on your left (or both colors on your lap next to each other) and then allow a slight twist to occur next to the most recent stitch when changing colors.

I’ve switched colors back and forth this way for years, but just recently noticed that the back of the work does not always look the same. To see what I’m talking about, please take a close look below at the back of the fabric (on the right). Do you see the jagged edges?

1. Front of the fabric (on the left) and back of the same section (on the right), showing the “twist” that occurs when switching colors.

Now look at the right half of photo 2 below. Notice the consistently smooth edges of the stripes on the back. The fronts of each sample (shown on the left in the photos above and below) look very similar, but the backs are quite different.

2. Front of the fabric (on the left) and back of the same section (on the right), showing the “twist” that occurs when switching colors.

Why do the backs look so different? Let’s see if you can figure it out. I’ll give you a hint. The jagged stripes in photo 1 document how many rounds I crocheted at one time. From bottom to top (the way it was worked), I crocheted 3 rounds, put down the work, then picked it up and crocheted 4 more rounds, then kept putting it down every time I finished a round. So, what was I doing differently each time?

It took me a while to figure it out, but I finally realized that the position of the balls were reversed each time I began crocheting again. When the brown ball was on one side of the yellow, the back of the work looked one way, but when it was on the other side, the twist that formed in the back looked very different. Eureka!

After figuring out which position produced the best results, I made sure the yellow and brown balls were always in the same place while crocheting the sample in photo 2. Much better! It’s amazing that this slight variation in technique makes such a difference – don’t you think?

The Lesson

Friday, July 20th, 2012

Othman Ribatallah has really grown up since Bronwyn met him in 2006. Maybe that’s why he and his Father were able to change places. Othman now runs the family store, stocked with a variety of high quality items, some of which Othman crafted himself. The inventory includes fine handwoven rugs, sterling silver jewelry, crocheted hats from all over Morocco and sculptures from other African countries, like Cameroon.

Othman and me (with my hat purchases) in front of his store in Essaouira.

Othman’s father now crochets and sells hats around the corner from the store. He learned to crochet from his father, who learned from his father, etc. Slip stitched hats were traditionally made by Berber shepherds as they tended their flocks of goats and sheep (today both men and women crochet hats in Morocco). His wife and daughter crochet the style of hat he’s holding (below) with a small hook and fine cotton thread. It takes them two to three days to slip stitch one with such small stitches. He prefers to crochet hats with a larger hook and heavier cotton yarn, which take two to three hours to finish. Prices reflect time spent to make each hat.

Othman’s Father and our tour leader, Susan Schaefer Davis, in Essaouira.

Our tour didn’t include Essaouira, so I asked if an extension could be added so we could look for tapestry crocheters there. Not only did Noble Journeys add the extension, but Susan found Othman on an earlier visit. When Othman mentioned to Susan that he taught crochet, she scheduled an informal private lesson for me!

But first things first! A proper Moroccan host must serve hot, frothy green tea made with fresh mint to welcome his guests! So after we arrived, Othman asked us to give him some time so that he could prepare everything. In the meantime, we visited the interesting nearby Fort.

Othman served us hot tea in the traditional way – pouring it from above.

Othman began the lesson by showing me how to crochet a hat with alternating rows of blue and white back loop slip stitches. The rim will have several rounds of front loop stitches for textural contrast. Othman often combines front loop (which he calls bottom loop) with back loop (top loop) stitches. (This slip stitch technique goes by many names, including Bosnian crochet.) A friend brought him the fine Italian wool that he’s using to make the hat.

Othman slip stitched a hat with alternating rounds of blue and white wool while I photographed his technique.

Othman then began another style hat with chunky cotton yarn. Like the Fes crocheter that I met earlier on the trip, he held the piece with his left hand, inserted the hook with his right hand, yarned over the hook with his right hand (like a knitter), then immediately pulled the new loop through both loops already on the hook. Colors were changed after the stitch was complete. His wooden hook was begun by a local carpenter, then Othman carved the large and small hook on both ends himself.

The yarn over is made by wrapping the yarn across the front of the hook, then around the back.

Othman crochets traditional hats and new styles of his own design. After showing me how to crochet three different types, he explained that someone with an open mind and imagination could crochet anything.

Othman is an EXCELLENT teacher and would gladly teach slip stitch tapestry crochet to you in Morocco or abroad. His English, French, and Moroccan Arabic are excellent, he patiently explains every step of the process – then helps you do it, and his fees are very reasonable.

Othman would also be happy to sell you his work, hats made in other parts of Morocco, and merchandise from his store. He is also willing to crochet hats with wool or thread that you send him. Packing is time consuming and postage is expensive, so several items would need to be purchased together to make the order worthwhile. Payment would have to be made in advance through Western Union. For purchases or to schedule a lesson, please email Othman at othmanshopp@gmail.com or phone him at 212 610 745 701 or write to him at Boutique N. 22, Rue Skala, Essaouira, Morocco.

I hope you’ll be able to visit Morocco someday! It’s such a beautiful and interesting country full of friendly, talented people. Although we flew into Cassablanca, some take the ferry from Algeciras in southern Spain (near Gibraltar) to Ceuta to enter the country. No matter how you get there, please say hello to Othman and his Father for me!

More Morocco

Saturday, June 16th, 2012

I’ve been wanting to go to Morocco for some time now, especially since Bronwyn introduced me to the interesting tapestry crochet hats made and worn there. Fortunately, my husband and I were able to join Susan Schaefer Davis during “WARP does Morocco” and Noble Journeys added an extension so that we could also go to Essaouira, the town where Bronwyn saw a hat being crocheted. A future blog will feature our wonderful adventure in that seaside town.

Anyway – on the first morning of the tour, our accommodating and very well informed multilingual guide, Ismail Bourqqadi, brought us to a fortress that overlooks Fes to give us an idea of the city’s expanse and beauty. We were really lucky to have the best guide in Morocco! During the week that Ismail shepherded us to and through numerous interesting cities and towns, he taught us about Moroccan history, culture, politics, and religion. He also made sure that we learned a little bit of Moroccan Arabic.

WARP tour group overlooking Fes while learning about Morocco from Ismail.

As we walked around the corner to get another view of the city, we found a gentleman busily tapestry crocheting hats for tourists. I’m not sure who was more excited – him or me! He was more than happy to show me his slip stitch technique and I was more than happy to buy several of his hats. I also purchased the piece he had just started and one of his cast metal crochet hooks.

Sherqi Said showing me how to do a yarn over. Part of my blue and purple tapestry crocheted camera case is on the ground in front of him.

Like many Moroccans, Sherqi wore a patriotic baseball cap, but the hats he designed and crocheted with double strands of brightly colored acrylic yarn featured the national colors and symbols or names of several countries. Some of them included filet work and other crochet stitches, but most were constructed with slip stitches worked into the back loop.

Patriotic acrylic hats designed for tourists by Sherqi Said of Fes.

Sherqi’s working method was quite different from mine. His left hand held the work and after inserting the hook under the back loop with his right hand, he let go of the hook and yarned over with his right hand like a knitter, then grabbed the hook again with his right hand and pulled the yarn through both loops.

While holding the piece with his left hand, he inserts the hook into the back loop of the stitch below, then does the yarn over across the front of the hook with his right hand, then pulls the loop through both loops on the hook, producing a slip stitch.

Hopefully, you’ll make it to Morocco someday soon! Ismail explained that Sherqi is not always at Borj Sud – especially during bad weather – but luck was with us that warm, sunny day – and maybe it will be with you, too!

Happy Day!

Monday, January 16th, 2012


. . . I still have a dream . . . , tapestry crocheted cotton, 27″ x 56″, 1983.

The light blue background symbolizes water and green the land that both unite and divide us. The rows of people represent the different human races, which are all the same size – with their hearts in the same place. Large hearts form between them as they unite and hold hands in the top row.

While crocheting the figures, I deliberated about whose portrait to place above them. Who best promoted the idea of different types of people living and working together as equals in a peaceful world? After considering many famous mythological and real people, I realized it had to be Dr. Martin Luther King, Jr.

To design the face, I projected Dr. King’s image onto graph paper that I modified to accommodate the tall single crochet stitches.

The facial proportions were good, but the curves were not as smooth as they could have been. It was after this project that I designed tapestry crochet graph paper to better accommodate stitch shape and placement.

In front of the Lincoln Memorial in 1963, this great man shared his dream that “. . . all of God’s children, black men and white men, Jews and Gentiles, Protestants and Catholics, will be able to join hands . . .” This is my dream, too, that people around the world will learn not only to tolerate, but also to celebrate different points of view and beliefs.

Happy Martin Luther King Day! May it be peaceful and inspirational for you and the world.

Graphs from Photos

Monday, December 26th, 2011

There are many ways to make tapestry crochet graphs from photos. The ideal subject is lit from the side and includes several values. A variety of graph papers and information about how to use them are included in my Tapestry Crochet and More Tapestry Crochet books. In summary, the image may be projected onto paper or placed under tapestry crochet graph paper on a light table. After tracing the major lines, the cells are then colored in with light, medium and dark colored pencils.

Another approach utilizes computer graphics. The below images were done in a just few minutes with Photoshop, but several other programs could have produced similar results. Reducing the colors of the photo helps visualize the crocheted version and often makes it easier to trace onto tapestry crochet graph paper.

The number of colors and the posterized colors themselves are easily changed in Photoshop.

The online site, KnitPro, quickly (and for free) transformed my photo into a square-ruled graph.

KnitPro just as easily produced the rectangle-ruled graph below.

To my knowledge, though, there is no computer program available that will fill in tapestry crochet graph paper automatically. Digital versions of the most popular tapestry crochet graph papers are posted on the bottom of my tapestry crochet web page. The graph paper may be printed out, then placed over an image on a light table and filled in by hand or the graph may be digitally placed over a photo, then filled in (cell by cell) with the paint bucket tool.

For creating graphs of animals, flowers, etc., there are millions of free online images available for inspiration. For instance, Google “horse”, then click on “images” to find a profile view, then trace it onto the appropriate graph paper. This method helps achieve more accurate proportions and had I used one of those images, perhaps some of my horses would NOT have turned out like donkeys!

Who knew?

Sunday, June 12th, 2011

Yarn under the hook using Esther’s method . . .

. . . or yarn over the hook as usual?

Who would have thought that grabbing the yarn from the front or the back would make a difference?

Not only does the design slant less with the yarn under technique, but there’s a sharper color transition. Less of the carried color is seen (especially where colors are changed) in the top two rows of cats. Why is that? Perhaps because the yarn twists slightly differently when yarning under.

If only I had paid closer attention in Guatemalan so many years ago! I always wondered why the motifs on their tapestry crocheted fabric slanted less than mine.

So now there’s a subtle additional tapestry crochet design choice! For tapestry crocheting zig-zags or the bottoms of hearts (where more of a slant is desired) then yarn over the hook. For less slant, yarn under!

More Amazing!

Wednesday, May 25th, 2011

I hate it that I’ve been too busy to blog, especially when there’s so much to share! Where to begin? Let me start with my trip to Asheville, NC, where I attended the WARP (Weave a Real Peace) conference in early May. It was exhilarating to be surrounded by so many inspirational women! Reconnecting with friends and making new ones was fabulous.

The day before leaving for Asheville, I realized that the amazing tapestry crocheter featured in one of my 2009 blogs lived there. So, I arranged to meet Esther at Earth Guild, where she works.

First she introduced me to her tapestry crochet hats. Esther is so creative and generous! For instance, she carries elastic in the last few rows for a better fit. What a great idea! (Esther’s pattern for the green and white pinwheel in the background of the picture below is part of her Tapestry Crochet Basics packet sold at Earth Guild.)

Esther also came up with a great way to carry both colors so that she can go back and forth between them without readjusting the yarns on her left hand between the changes. Tension is maintained by holding the yarns with the middle, ring, and little fingers of the left hand.

But the light bulb really went on when I noticed that her motifs don’t slant as much as mine. In fact, Esther made a special tapestry crochet graph paper with less slant.

What does she do differently? Let’s see if you can figure it out by looking at the photos below.

Did you see it? Instead of going under the yarn and grabbing it yarn from the back, she hooks it from the front! Eureka! I suspect that many Guatemalans tapestry crochet with Esther’s method because the motifs on most of the bags purchased down there do not slant very much. My next blog will explore these two methods more in depth.

You’ve probably also noticed Esther’s colorful yarn. Some of it is Earth Guild’s cotton Dragon Tail Yarn and the rest she dyes herself. Her hand painted yarns are sold at Earth Guild and her dying method is explained in her Tapestry Crochet: Basics, Bags, and Pouches packet sold at Earth Guild. It also includes stitch tutorials (her method for right and left-handed crocheters), patterns, design notes, several animal motifs, tapestry crochet graph paper, and tips.

My only disappointment is that I didn’t schedule enough time to look at more of Esther’s amazing tapestry crocheted works of art!

Ekaterina’s Shawl

Tuesday, October 19th, 2010

This shawl really brings me back! When I began crocheting flat pieces, I crocheted across, then cut the yarn; the same technique used for this shawl. In this case, the cut ends eventually become fringes.

The stitches on each row position themselves a little to the right, producing slightly angled sides. A parallelogram is perfect for shawls and scarves, though, but not good for rectangular wall hangings, so I eventually came up with a different technique for crocheting flat pieces with the “front” of the stitch always facing forward.

I began to crochet the shawl the day after the Dolce yarn arrived from Interweave – just 2 days before a school trip to Italy.  I finished it two days after returning home, right before the deadline.

I laid the finished shawl on a large beach towel on the floor, but noticed lots of ripples in the areas with little color changes, so I pulled on the carried yarns, where possible, to flatten it. Unfortunately, this adjustment made the shawl shorter than the require 70″ length stipulated in the contract. It was also 1/2″ too narrow!

First Version of the Interweave Tapestry Crochet Shawl
The first version of the shawl, crocheted with Cascade’s Dolce (blend of alpaca, wool, and silk).

Fortunately, I had enough Dolce left over to crochet another one. I emailed a photo and explained my dilemma to the editor and asked for more time. Granted.

For the next shawl, I switched to a larger hook, added stitches to make it wider, enlarged the inner rectangles, then eliminated the vertical stripe to make it easier to shape the shawl by pulling in the carried yarns from the ends right before blocking.

Interweave Shawl
The new and improved shawl!

Tapestry Crochet Shawl
Detail of the shawl and fringe.

How was the fringe made? It’s plied by repeatedly twisting each yarn in the opposite direction several times. Just take a look below to see what I mean:

How to Make Fringe - Step A
Twist 2 neighboring yarns of the same color clockwise.

How to Make Fringe - Step B
Then put them together and twist them counterclockwise.

How to Make Fringe - Step C
Twist 2 more neighboring yarns of the same color clockwise.

How to Make Fringe - Step D
Then put them together and twist them counterclockwise.

How to Make Fringe - Step E
Retwist the two neighboring plied yarns counterclockwise.

How to Make Fringe - Step F
Then put them together and twist them clockwise.

How to Make Fringe - Step G
Make an overhand knot 6” from the shawl edge. Cut off the excess, leaving a 1” end.

Interweave dubbed it Ekaterina’s Tapestry Shawl. You can find the instructions in Interweave Crochet Accessories, a special issue of Interweave Crochet.

I prefer to crochet for relaxation at my own pace and submit the finished project for publication, but most editors prefer to choose the yarn and have tight deadlines, which stresses me out! What do you think? Was it worth it?

Handy Blocking

Saturday, April 4th, 2009

The brand new UK magazine, Inside Crochet, includes the pattern for this Handy Basket (tapestry crocheted with Size 18 La Espiga Omega Nylon). Why does it look so lumpy? Well, just about everything I tapestry crochet looks like that – until the last step of the process, “blocking”.

Handy Basket Before Blocking
Handy Basket before blocking.

My favorite blocking tool is a steam iron. Since nylon melts at high temperatures, it’s on the lowest setting that will allow steam to form. (Higher temperatures may be used with other fibers.) Steam is not absolutely necessary, but it makes blocking much easier.

Bottom of the Handy Basket
Blocking the bottom of the Handy Basket.

The iron may be placed directly onto the project, or a towel may be placed between the two to protect the surface of the fabric.

Blocking Handy Basket
Blocking the sides of the Handy Basket.

I press down hard – on the inside and outside – all around. Fortunately, this basket is large enough that the iron fits inside without a problem. (I insert a towel-covered can into smaller baskets to help support and shape them during blocking.)

Handy Waste Basket
Handy Basket after blocking.

Quite an improvement,  don’t you think?

This Handy Basket pattern is now available for both right handed and left handed crocheters on Ravelry.

Felted Tapestry Crochet Tutorial

Tuesday, July 1st, 2008

For those of you who like to crochet loosely – felted tapestry crochet is for you – since it’s done with a large hook and loose stitches. The finished pieces shrink and felt like magic in a washing machine.

What’s so great about felted tapestry crochet? The pattern is incorporated into the fabric as it’s crocheted, the extra yarn adds bulk so that no lining in necessary, and felting the piece in a washing machine is a cinch.

Before and after Felting

The Felted Amulet Bag project above featured in my free video is a great introduction to tapestry crochet. The free instructions are linked on my tapestrycrochet.com web page. For more about felted tapestry crochet, please look at my Bead & Felted Tapestry Crochet book. One thing I forgot to mention in the video, though, is that you need to set the washing machine for a cold water rinse (after the soapy, HOT wash). Sorry about that! I hope you’ll give felted tapestry crochet a try!

Polymer Clay Crochet Hook Handles

Thursday, May 22nd, 2008

Tapestry crocheting with a hook that has a handle is SO MUCH BETTER than crocheting with a naked hook. Not only do you look very cool tapestry crocheting with a one-of-a-kind work of art, the handle makes crocheting tightly much easier. Three medium-sized handles like the ones below can be sculpted from each 56 gram package of polymer clay.

Crochet hooks with polymer clay handles
These handles were made from two 56g packages of polymer clay.

Polymer clay is sold online and at your local crafts store. It comes in many colors and sizes and instructions are on the wrapper.

To make a handle, just pinch off chunks of polymer clay, mix colors if you like, smoosh it between your fingers to make it more pliable, smooth and roll it into a hotdog shape, texture it (if you like) stick in the hook, squeeze the clay around the hook, mark the hook size on the bottom of the handle, place it on a tinfoil-lined pan, then bake it for 30 minutes at around 110°C / 230°F.

I made my first crochet hook handles (the ones below) with Carolyn Routh. I wanted to do something that was creative and appropriate for a tapestry crochet artist like Carolyn and thought she might enjoy making them when she visited – and I was right!

Polymer clay handles on crochet hooks
Handles can take any form and size. I squeezed the bottom one to perfectly fit my grip!

Polymer Clay Crochet Hook Handles from the Video
You can see these handles being made in my free video.

This project is easy and so much fun that it would be a perfect hands-on workshop! Why not invite over a friend (which doubles the fun) or host a crochet handle-making party?

Flat Tapestry Crochet Tutorial

Friday, May 16th, 2008

In response to many requests for a flat tapestry crochet tutorial, I recently produced a free video that includes both the Alternate-Rows-Switch-Hands-Crochet and Reverse Crochet techniques – both of which will produce a flat tapestry like the one below right.

Flat tapestry crochet deer
Most pieces that are tapestry crocheted back and forth look like the sample on the left. I prefer the look of the sample on the right with the front of the stitches on the same side of the fabric.

This free video is far from perfect – I could have done and said many things better – but I hope it’s clear enough that you will give this challenging technique a try!