This shawl really brings me back! When I began crocheting flat pieces, I crocheted across, then cut the yarn; the same technique used for this shawl. In this case, the cut ends eventually become fringes.
The stitches on each row position themselves a little to the right, producing slightly angled sides. A parallelogram is perfect for shawls and scarves, though, but not good for rectangular wall hangings, so I eventually came up with a different technique for crocheting flat pieces with the “front” of the stitch always facing forward.
I began to crochet the shawl the day after the Dolce yarn arrived from Interweave – just 2 days before a school trip to Italy. I finished it two days after returning home, right before the deadline.
I laid the finished shawl on a large beach towel on the floor, but noticed lots of ripples in the areas with little color changes, so I pulled on the carried yarns, where possible, to flatten it. Unfortunately, this adjustment made the shawl shorter than the require 70″ length stipulated in the contract. It was also 1/2″ too narrow!
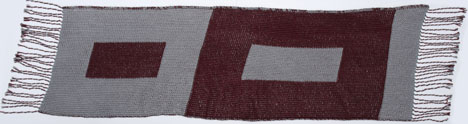
The first version of the shawl, crocheted with Cascade’s Dolce (blend of alpaca, wool, and silk).
Fortunately, I had enough Dolce left over to crochet another one. I emailed a photo and explained my dilemma to the editor and asked for more time. Granted.
For the next shawl, I switched to a larger hook, added stitches to make it wider, enlarged the inner rectangles, then eliminated the vertical stripe to make it easier to shape the shawl by pulling in the carried yarns from the ends right before blocking.
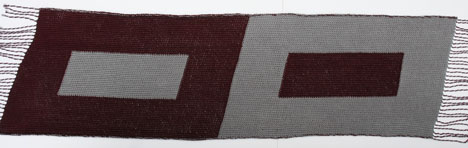
The new and improved shawl!
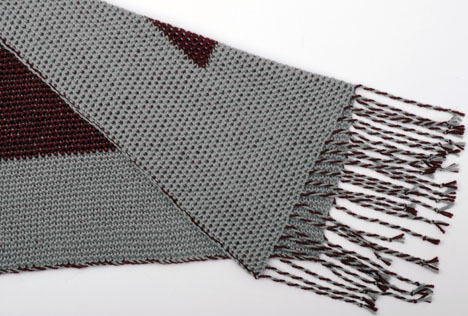
Detail of the shawl and fringe.
How was the fringe made? It’s plied by repeatedly twisting each yarn in the opposite direction several times. Just take a look below to see what I mean:
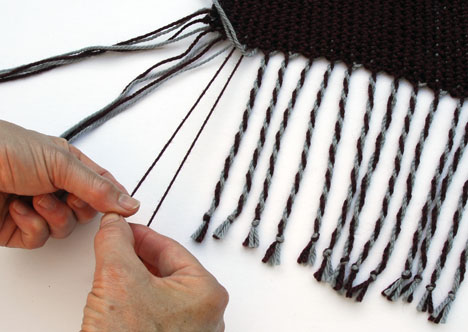
Twist 2 neighboring yarns of the same color clockwise.
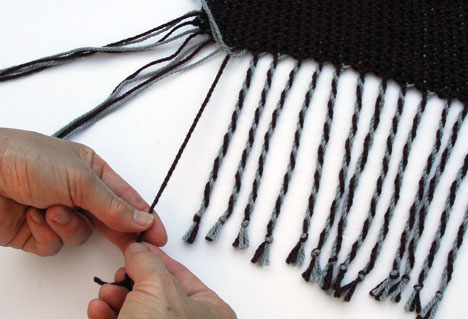
Then put them together and twist them counterclockwise.
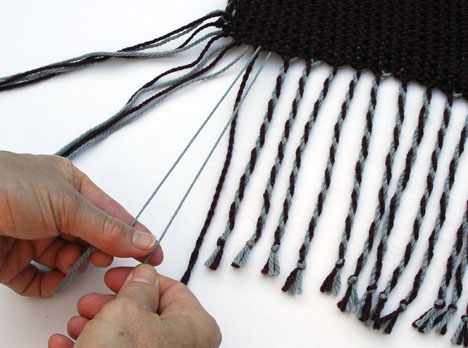
Twist 2 more neighboring yarns of the same color clockwise.
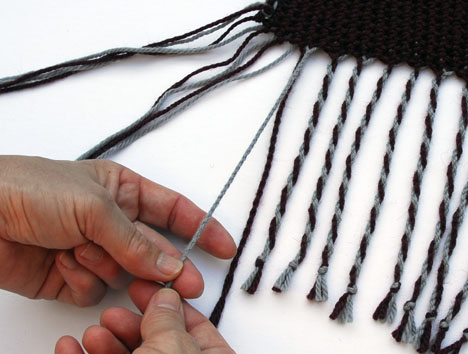
Then put them together and twist them counterclockwise.

Retwist the two neighboring plied yarns counterclockwise.
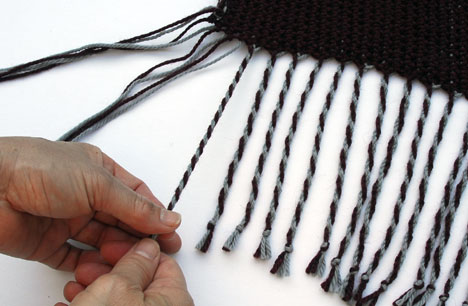
Then put them together and twist them clockwise.
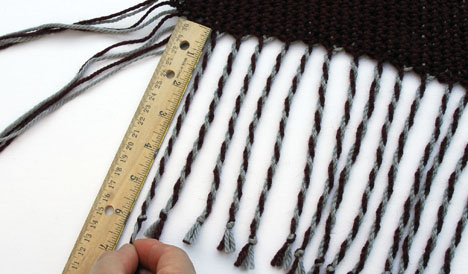
Make an overhand knot 6” from the shawl edge. Cut off the excess, leaving a 1” end.
Interweave dubbed it Ekaterina’s Tapestry Shawl. You can find the instructions in Interweave Crochet Accessories, a special issue of Interweave Crochet.
I prefer to crochet for relaxation at my own pace and submit the finished project for publication, but most editors prefer to choose the yarn and have tight deadlines, which stresses me out! What do you think? Was it worth it?
Very nice indeed. Warm and cozy, yet tailored.
The stitch technique and cutting the yarn for self fringe would be an interesting way to use odds and ends for a more eclectic shawl.
That is beautiful! What a nice stitch technique. I’ve always wondered how to do the fringe like that as well. Great tutorial!
I bought the magazine for the shawl pattern. 14 skeins of Cascade Dolce will run over $100. I love my friend about $50 worth. I wonder which less expensive yarn would work in its place.
Dolce yarn is similar in weight to worsted, so any similar substitution would work – natural or synthetic. Just hold the yarn up to your face to make sure that it’s not scratchy.