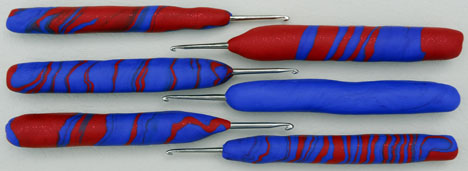
These handles were made from two 56g packages of polymer clay.
Polymer clay is sold online and at your local crafts store. It comes in many colors and sizes and instructions are on the wrapper.
To make a handle, just pinch off chunks of polymer clay, mix colors if you like, smoosh it between your fingers to make it more pliable, smooth and roll it into a hotdog shape, texture it (if you like) stick in the hook, squeeze the clay around the hook, mark the hook size on the bottom of the handle, place it on a tinfoil-lined pan, then bake it for 30 minutes at around 110°C / 230°F.
I made my first crochet hook handles (the ones below) with Carolyn Routh. I wanted to do something that was creative and appropriate for a tapestry crochet artist like Carolyn and thought she might enjoy making them when she visited – and I was right!
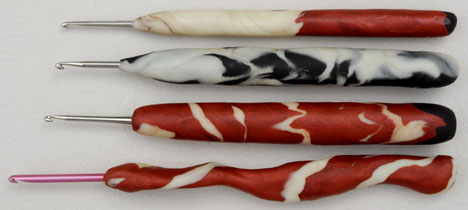
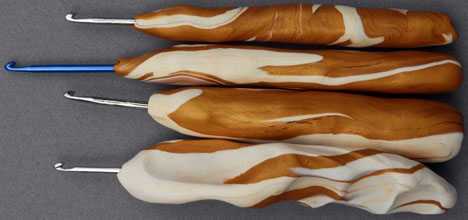
Handles can take any form and size. I squeezed the bottom one to perfectly fit my grip!
You can see these handles being made in my free video.
This project is easy and so much fun that it would be a perfect hands-on workshop! Why not invite over a friend (which doubles the fun) or host a crochet handle-making party?
Thanks for the very helpful video. This is the first time I have seen you… very exciting.
Take Care
Oh thank you! I’ve got nakie hooks!
Thank you Carol..I just this year bought me some hooks made this way off of Etsy and love them..I wondered how they were done. Now I know and can make my own personalized hooks 🙂
Thank you, Thank you!!!
De’Anna
Hi Carol:
This was very kind to share your helpful hints with us at no charge. You are a warm and friendly lady and I apreciate your talent and generocity.
Thanks for this great idea it sure will help those who really need it the most. This idea will also help prevent and prolong the hookability throughout the crochet community. Bless You Carol. I’m heading over to buy something from your site right now as I love to support women who care.
your crocheting buddy,
Mary
Thanks, Carol!
I can’t wait to pick up some clay and try this. My bamboo-handled hooks (which help these old hands from getting tired) only go down as small as G, which isn’t small enough for what I want. I used a method before of just wrapping yarn around the handles of my steel hooks, and isn’t very attractive. This method will allow me to leave my hooks out 🙂
[…] I had bought some polymer clay? Well now I’ve found a perfect project for it. Look at these polymer crochet handles. Sometimes it’s better to use a steel crochet hook but find that it slides too much in my […]
Carol,
I’ve crocheted for many years, and worked with polymer clay for several years as well, not to mention having added polymer clay handles to many polymer clay tools! For some reason, I never put the two together, by putting polymer clay on the crochet hook handles! I will now!
I do have some helpful hints to make the application of the PC more durable:
1) Degrease: it is very important that the crochet hook be degreased to remove all oils, say from your hands or other environmental sources. Use alcohol to do so, then allow the metal to dry thoroughly. Thereafter, do not touch the hook, either wear clean rummber gloves, or handle wit a papertowl or similar.
2) Sand the metal surface. Use wet/dry sandpaper to scratch the surface, giving the clay more to ‘bite’ onto. Use a lower grit, perhaps 100 or so. Remove metal debris afterl
3) Apply white craft glue (Elmer’s or similar) to the metal surface, and allow it to dry very thoroughly. Make sure the glue is applied with an even coat. Let it dry overnight, or if in a hurry, let it cure in warm toaster oven for an hour or so. Be sure it is truly dry before you apply the clay!
When you bake the handle, follow the package directions for temperature and time. I generally cure at 275 deg F, for at least 1/2 hour for items that have 1/4 to 1/2 ” thick polymer clay wall. If your item has a very thick cross-section, greater than 1/2″, you may need to keep it in the oven longer. If so, cover it with a tent of alumninum foil to prevent scorching.
It is also important to know that most clay manufacturer’s recommend curing/baking the polymer clay in a toaster oven, or preferably a convection oven that is dedicated to polymerclay. Once an oven has been used for clay, the oven could have residual toxic material adhering to the oven surfacing that may be passed to food prepared in the oven in the future.
For further information about polymer clay, there is a wealth of documentation at Diane Black’s https://www.glassattic.com. Have fun!
I used to own two hooks by Boye, done in the 80s, that had a plastic casing around them. I loved them until they wore out!
I have made these, from your video, and am astonished at how much like the Boye they are. One thing, they are heavier than I had expected, but that is made up by the fact that my carpal tunnel is kept quiet as long as I use hooks made like this. Thank you for your very helpful video!
I attended your Tapestry crochet beading workshop in Buffalo, NY, Aug. 5-9, 2009, and showed you my tote bag in Hilos Omega nylon yarn, my favorite. I decided to make your “Horse Around Purse” in nylon and found my fingers were becoming bruised. I saw your video and will create my handles for a more comfortable crocheting experience.
I just made my first hook yesterday. If I had of known how easy it was to do, I would have done this ages ago. Making more today! I love them! Thanks for the video!
[…] it with Aunt Lydia’s Size 3 Fashion Crochet Thread and a size 1 (2.25mm) steel crochet hook with a handle to produce the dense fabric. A plain hook would have been OK, but the handle helped my wrist and […]