In response to many requests for a flat tapestry crochet tutorial, I recently produced a free video that includes both the Alternate-Rows-Switch-Hands-Crochet and Reverse Crochet techniques – both of which will produce a flat tapestry like the one below right.
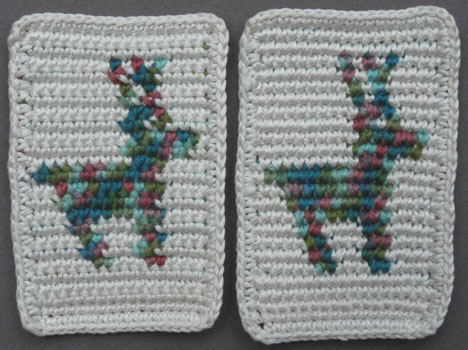
Most pieces that are tapestry crocheted back and forth look like the sample on the left. I prefer the look of the sample on the right with the front of the stitches on the same side of the fabric.
This free video is far from perfect – I could have done and said many things better – but I hope it’s clear enough that you will give this challenging technique a try!
Wonderful video!! I do some things quite well with my left hand so I will be trying this – I really don’t like the ragged edges and I make many graph ghans.
Thanks again!
I would have never thought of this!
I knit both english and continental so I guess I should also learn to crochet both left handed and right handed.
Thank you for this tutorial, the video was perfect.
This video is great. Clear and useful.
I’ve put it on the Tapestry Crochet Blogspot https://tapestrycrochet.blogspot.com/ .
It is a little long, took 2 & half hours for me to download on dial-up!
So maybe it could be in 2 parts.
Don’t forget that Blogspot is open to you to post on anytime too.
Just email me and I’ll add you to the authors list.
I’m sure this tutorial will be hugely helpful to all who view it.
Certainly helped me shape up! I could feel my brain activity shifting right/left/right. lol.
Cheers
Anu.
Awesome Carol! Sometimes the most simple solutions are the most revolutionary. I love the switch hands idea and will try it!
One of the clearest vidoes I’ve seen . Thank you for showing both ways . I will be giving it a try . I purchased a red and black crochet cotton to use. Some absolutely lovely projects on your sight and on the yahoo groups’ site.
Cool video, learned something new. I like the baskets on your pattern page. I once had this DIY book where some baskets like this where sewn, which is very work intensive. It never occurred to me to crotchet it. So much easier. I will try it as soon as possible. Thanks!
Great video. I’ve always wanted to learn tapestry crochet.
Thanks for showing the 2 different options for crocheting every other row. I like to know what mt options are. :3
Hi there!
I tried watching the video and it’s hard for me to see what’s going on. Would it be possible to redo it in a bigger fashion?
Unfortunately, I can’t change the size of the video on YouTube, but you can go to the top of your browser and click on “view” then click on “zoom” then keep clicking on “zoom in” to see it larger. I hope this helps.
Try putting a few colors to your right, others on your lap and a few to your left. Then let the colors twist next to the stitch as you change colors. You’ll still have to occasionally untangle some of the colors, but this method will make them tangle less often.
I have made a few things in tapestry crochet with two or three colors. I am working on a pattern that has 7 different colors. What can I do to keep the yarn from getting tangled. As I switch colors, I try to keep the unused strands in somewhat of an order. I always end up with a huge mess and have to take time to untangle all my yarn. Is that anything I can do to make this easier?
Hello, And all your items are BEAUTIFUL.
I would like to know how you ended your stitch when you made the basket with the nylon thread?
I have made a hat and just don’t know how to end it, or what type of glue or what would hold it in place. I like working with the nylon, but realized at the end, that it would not stay knotted.
Please help.
Thank you
Pat
I used my hook to insert the end back and forth for a few inches under the top loops of the stitches in the last row or round. I’m finishing a new way now, though, by threading a tapestry needle with the tail and inserting the needle in the bottom part of the top row or round of stitches for a few inches in the spot where the other color is carried.
I am going to make a large afghan with spiderman on it. 🙂 There will be 4 colors used throughout. My question is, Do I start using & carrying ALL 4 colors from the very beginning? Even the beginning chain? (The 1st 27 rows are one solid color, no color changes) And also what size hook should I use?? (I am using Red Heart Super Saver worsted weight). Thank you for any advise I can get.
Carol Anderson
The answer depends on the design. If one or more colors are not used in a spot where they could be easily picked up and dropped off when needed, then carry all of the colors all of the time to make sure that the stitches and tension are the same throughout. I like to use a J or K hook to create loose stitches to produce a fabric with drape, but it depends on how tight you crochet. The loose stitches will show the carried colors, so it is important to carry the same colors throughout.
Bless you – thank you so much for this video. I really like that you gave two options. And I didn’t know that using your non-dominant hand means you’re developing your brain cells but it makes so much sense since we only use a small percentage of our brains to begin with. Thank you thank you thank you … I can’t say it enough 🙂
[…] blog about tapestry crochet includes a tutorial category, and there I found a post about the mess wrong sides make. Her solution? Crochet in such a way that all the stitches’ fronts are on the same side of […]
[…] will be able to choose one of two methods to tapestry crochet the Flat Tapestry Crochet Deer project below. The size of the stitch determines […]
[…] but not good for rectangular wall hangings, so I eventually came up with a different technique for crocheting flat pieces with the “front” of the stitch always facing […]