
© Handspinners 2004
All rights reserved.
Unauthorized reproduction prohibited.
How To Carry Yarn
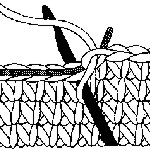
The hook is usually inserted from front to back, under the two top loops of the stitch being crocheted into. If the hook is inserted into only one of the top loops, there will be a horizontal line of yarn over each crochet stitch. Being able to carry colors is essential for tapestry crochet, allowing a two-or more color design to be worked without floats on the back. The concealed colors make the finished piece more durable. The carrying technique enables knots and loose ends to be eliminated as well. To carry a yarn, first, lay the additional yarn over the top two loops of the stitches being crocheted into, leaving a one-inch tail sticking out of the back. The carried yarn can be kept in place with the thumb of the left hand.
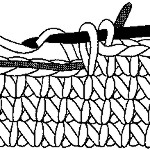
Single crochet across the row as usual, keeping the carried yarn on top of the loops, crocheting under and over it. If done correctly, the carried yarn will not be visible from either the front or the back of the work. After the row has been completed, the one inch end (that you left sticking out of the back of the piece) can be snipped off. More than one color yarn can be carried at the same time for a multicolored tapestry crochet motif. Each yarn carried will slightly increase the height of the single crochet stitch. For a consistent appearance, start to carry the yarn at the beginning of a project, even if there will not be any color changes for a few rows.
 Tapestry Crochet Handspun Hats
© Dr. Carol Ventura 2004
Over twenty years ago, I took a spinning class in graduate school. Our assignment for the semester was to spin and dye several pounds of natural fiber. After the class was over, I did not know what to do with the many balls of yarn because each was a different color. So, over the years my spinning wheel and balls of yarn moved around with me from house to house and from husband to husband.
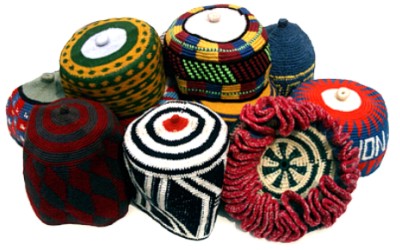
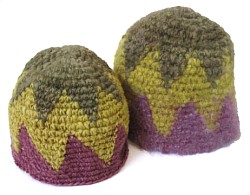
Inspired by some tapestry crocheted hats from Cameroon, I decided to experiment with my handspun. With tapestry crochet, two or more colors create a motif; one is crocheted while the other is carried. Depending on the tension and number of yarns carried, the finished fabric can be stiff or supple. Tapestry crochet has the flexibility and portability of crochet, but the finished pieces look woven.
Having been spun by a novice, my yarn was very uneven and weak in certain spots. So, I dusted off my spinning wheel and transformed some one-ply yellow (dyed with dandelion, alum, and ammonia), brown (dyed with black oak bark), and pink (dyed with Brazilwood and chrome) yarn, into two-ply. After crocheting the first hat, I still had enough yarn for a second hat, so I decided to experiment with felting. I crocheted a larger hat, then threw it the washing machine to felt it. I hope you will use some of your precious handspun to experiment with tapestry crochet!
Small Hat
- Materials: Crochet hook size J (10-6.00 mm.) or the size that will give an acceptable gauge.
Safety pin, stitch counter, or a piece of yarn of a contrasting color for counting the rounds. - Gauge: 3 1/2 stitches equals 1 inch and 3 1/2 rows equals 1 inch.
- Size: 21" circumference
- Yarn: 1.5 ounces of brown, 1.5 ounces of yellow, and 1.75 ounces of pink 2-ply hand-spun worsted weight yarn (approximately 10 wraps per inch) .
Felted Large Hat
- Materials: Crochet hook size P (3/0-10.00 mm) or the size that will give an acceptable gauge.
Safety pin, stitch counter, or a piece of yarn of a contrasting color for counting the rounds. - Gauge before felting: 2 1/2 stitches equals 1 inch and 2 rows equals 1 inch.
- Size: (before felting) 31" circumference x 9" high; (after felting) 23" circumference x 8 1/2" high.
- Yarn: 2.25 ounces of brown, 2.25 ounces of yellow, and 3 ounces of pink 2-ply hand-spun yarn.
Directions
- Round 1: Starting with the brown yarn, make a slip knot (leaving an eight-inch tail), then chain 4 stitches. Join the ends together to form a ring by working a slip stitch into the first chain stitch. Single crochet 6 stitches loosely into the ring (while carrying the tail of the yarn). The hat should have a total of 6 stitches when you finish this round. This piece is worked as a spiral, not in concentric rings. To keep track of where each round ends, slip a safety pin or stitch counter into the top of the last stitch of the round or lay a two inch piece of yarn of a contrasting color across the path of the last stitch. You will remove the safety pin from the last stitch as you come to it again and slip it into the new last stitch or cross the path of the last stitch with the end of the counting yarn at the end of each round. Pull a little on the counting yarn as it runs out to make it longer.
- Round 2: Continue to carry the tail. Increase by crocheting 2 stitches into each stitch. The hat should have a total of 12 stitches when you finish this round.
- Round 3: Cut the tail flush, then start to carry the yellow colored yarn. Increase again in every stitch. The hat should have 24 stitches when you finish this round.
- Round 4: Increase in every second stitch. The hat should have 36 stitches when you finish this round.
- Round 5: Crochet one round without any increases.
- Round 6: Increase in every third stitch. The hat should have 48 stitches when you finish this round.
Begin tapestry crochet motif:
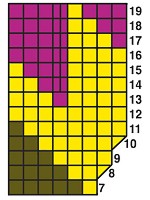 Round 7: Rounds 7 through 19 correspond to the illustrated graph
(read from right to left and bottom to top). The graph is for
right-handed crocheters. Left-handed crocheters should look at the
reversed image of the graph in a mirror. To do a tapestry crochet
stitch, colors are switched while 2 loops of the single crochet stitch
are still on the hook. Tapestry crochet 1 yellow, then 5 brown
stitches. Repeat around. Every once in a while, untwist the yarns by
holding the hat up in the air with one of the yarns while pulling on
the other yarn. Let the piece spin around in the air so that the yarns
untangle.
Round 7: Rounds 7 through 19 correspond to the illustrated graph
(read from right to left and bottom to top). The graph is for
right-handed crocheters. Left-handed crocheters should look at the
reversed image of the graph in a mirror. To do a tapestry crochet
stitch, colors are switched while 2 loops of the single crochet stitch
are still on the hook. Tapestry crochet 1 yellow, then 5 brown
stitches. Repeat around. Every once in a while, untwist the yarns by
holding the hat up in the air with one of the yarns while pulling on
the other yarn. Let the piece spin around in the air so that the yarns
untangle.- Round 8: Increase in the first stitch by tapestry crocheting 2 yellow stitches into the first stitch, then tapestry crochet one more yellow, then 4 brown stitches. Repeat around. The hat should have 56 stitches when you finish this round.
- Round 9: Tapestry crochet 4 yellow, then 3 brown stitches. Repeat around.
- Round 10: Increase in the first stitch by tapestry crocheting 2 yellow stitches into the first stitch, then tapestry crochet 4 yellow, then 2 brown stitches. Repeat around. The hat should have 64 stitches when you finish this round.
- Round 11: Tapestry crochet 7 yellow, then 1 brown stitch. Repeat around.
- Round 12: Crochet around almost all the way with yellow without any increases, while carrying the brown yarn. (For a larger hat, increase with yellow in every eighth stitch). Before completing the last 6 stitches of the round, cut the carried brown yarn, then begin to carry the pink yarn for the last 6 stitches.)
- Round 13: Tapestry crochet 4 yellow, 1 pink, then 3 yellow stitches. Repeat around.
- Round 14: Tapestry crochet 4 yellow, increase with pink by tapestry crocheting 2 pink in the next stitch, then tapestry crochet one more pink, then 2 yellow stitches. Repeat around. The hat should have 72 stitches when you finish this round.
- Round 15: Tapestry crochet 4 yellow, 4 pink, then 1 yellow stitch. Repeat around.
- Round 16: Tapestry crochet 4 yellow, then 5 yellow stitches. Repeat around. (For a larger hat, increase in the first pink stitch).
- Round 17: Tapestry crochet 1 pink, 3 yellow, then 5 pink stitches. Repeat around.
- Round 18: Tapestry crochet 2 pink, 2 yellow, then 5 pink stitches. Repeat around. (For a larger hat, increase anywhere in the pink).
- Round 19: Tapestry crochet 3 pink, 1 yellow, then 5 pink stitches. Repeat around.
- Rounds 20 & 21: Crochet around with pink without any increases, while carrying the yellow yarn.
- Last round: Crochet around with pink without any increases, while carrying the yellow yarn. Cut the yellow yarn flush. Do 1 slip sitch with pink, then cut the pink yarn, leaving a 6" tail. Yarn over with pink and pull it all the way through the loop on the hook. Work in the tail by pulling it back and forth through the last row of stitches for two inches. Cut the end flush. For the felted hat, set the washing machine for hot wash, cold rinse, normal agitation, then add some mild soap and wash the felted hat by itself. There is no need to block these hats.
Instructions for the tapestry crochet stitch can be found here.
While Carol Ventura served as a Peace Corps volunteer in highland Guatemala, she was inspired by the
 colorful tapestry crocheted shoulder bags made there. Since that time
she has explored the design potential of the technique, developed a
system of diagramming patterns, and created a variety of flat and
three-dimensional projects, and written the books Tapestry Crochet and
More Tapestry Crochet. "I love that tapestry crochet is so portable.
In fact, I often bring it with me when I travel, even to China!"
For more information or to order Carol's books please visit her website
tapestrycrochet.com.
colorful tapestry crocheted shoulder bags made there. Since that time
she has explored the design potential of the technique, developed a
system of diagramming patterns, and created a variety of flat and
three-dimensional projects, and written the books Tapestry Crochet and
More Tapestry Crochet. "I love that tapestry crochet is so portable.
In fact, I often bring it with me when I travel, even to China!"
For more information or to order Carol's books please visit her website
tapestrycrochet.com.